7.10.14

Thai Clams


The easiest way to make me feel happy is to eat foods that I ate when I was living in Chiang Mai, Thailand.

Yesterday I visited an Asian supermarket and bought all the ingredients.
This recipe has no quantities as you need to up on the herbs and spices you like and use less of the ones you don't like so much.

You can substitute the clams for any other seafood you like or even use another type of protein or even a vegetable, just watch for cooking times as you do not want to overcook it.

It is delicious and this is how you make it:

Bash some lemongrass, fresh turmeric, fresh chillies, garlic, galangal or ginger in a pestle and mortar until they release their aromas.
Heat some oil on a pan or wok, if you have one and add the aromatics you just bashed. Stir fry them for about 30 seconds or until your kitchen smells like Nirvana.
Add the washed clams and mix. Add fish sauce and add 1/4 cup of water or stock. Mix everything and when it boils fiercely put the lid on it for about 4 minutes or until the clams open up. Please discard the ones that did not open up properly.
Squeeze a tiny bit of lime juice and stir.
Turn the heat off and add some chillies and freshly chopped coriander.
Serve hot and enjoy!
It is a treat!
Please, let me know how it goes!

18.9.14

Coconut and Condensed Milk Cake


My Mum makes a cake that is moist and delicious and it looks like this.
I do not have the recipe so I just made this up.
It pleased a few guests and friends.
Let us see what you think about it.

Ah, in case you are wondering, this is most definitely not a diet cake!

You will need:

2 cups self raising flour
1 cup sugar
4 eggs
1 cup vegetable oil
1 cup milk
1 cup desiccated coconut if you cannot get freshly grated{I used fine cut}
1 can condensed milk
1 cup coconut to decorate cake

All ingredients need to be at room temperature.

Pre heat your oven to 180 Celsius.
Mix all ingredients {except the condensed milk and the second cup of coconut} until you have a homogenous dough.
Cover a baking tin with parchment paper. I used 2 trays of 20cmX20cm as I did not have a bigger one at hand.
The cake has to be no taller than 4/5 cm tall after baking or else it will not be as moist as necessary.
Bake it until a stick is inserted and it comes out clean {about 30 minutes}.
When the cake is still hot make holes on it and drizzle with the condensed milk so that it moistens inside the cake {if your cake is very tall, cut the cake in half horizontally and drizzle inside of the cake too}.
Cover it with second cup of coconut.

Enjoy it with a nice espresso or a nice cup of tea!!!
Yummmm....


21.8.14

Grilled Bananas and Maltesers Sinkers {aka Heaven}


This is not so much a recipe but a Heavenly combination.
I am a total lover of grilled or BBQ banana, so when I had guests for dinner yesterday, 
I decided to use the bananas I had here and also the Maltesers bag 
I had in the cupboard. It turned out great!

You will need:

1 or 2 ripe bananas per person
Maltesers


Fire the BBQ or turn on your oven on high.
Make a light slit on the top side of the banana skin but make sure not to cut through the skin {your knife should not touch the fruit}.
Let it cook. It will take about 10 minutes or a little longer but the banana will be cooked and soft, the skin will open up and you can then sink the maltesers into the banana and put some on top too.
The combination of the hot banana and the melting chocolate with the crunch, is something everyone should try once in their lifetime!

Have fun!!! Let me know how it goes!!!

27.7.14

Rocket Pesto


This is delicious and so simple to make.

This is what I make whenever I have left over rocket leaves. I also add whatever other herbs, leaves or edible flowers I have in the fridge that maybe won't be used so soon.

I hate wasting food and it is so difficult when you cook for one or have left overs from dinner parties.

It is not exactly a traditional pesto as there is no basil, pine nuts or cheese, but you can add them if you wish. This is more like a herbal sauce.

I serve with with my low carb bread {toasted or not}, BBQ meats or fishes, mix or with pasta or on top of pasta, boiled eggs and/or as a salad dressing and for that all you have to do is add a little cider vinegar and wow: you have a green vibrant dressing!


You will need:

1 clove garlic {I do leave the skin on}
1 cup of young rocket leaves
1/4 cup flat leaf parsley {optional, but it gives it bulk and harmonizes the sauce}
6 nasturtium leaves and stalks {optional, but it makes it amazing}
green or red chilli {optional}
a generous pinch of salt and freshly ground black pepper
a big glug of extra virgin olive oil

On a heavy mortar {or a food processor} bash the garlic, chillies {if using} with the salt and once broken and smashed, add the leaves, herbs and/or flowers bit by bit. Pound them until they are as coarse as you like.
I like to have it rustic so it it does not look like green juice. Add the olive oil and stir the pestle around to amalgamate everything. Adjust the salt and pepper and serve it.

It keeps in the fridge in a sealed container or jam jar for about a week, for that you may want to cover it with olive oil so that the leaves won't go dark.


23.7.14

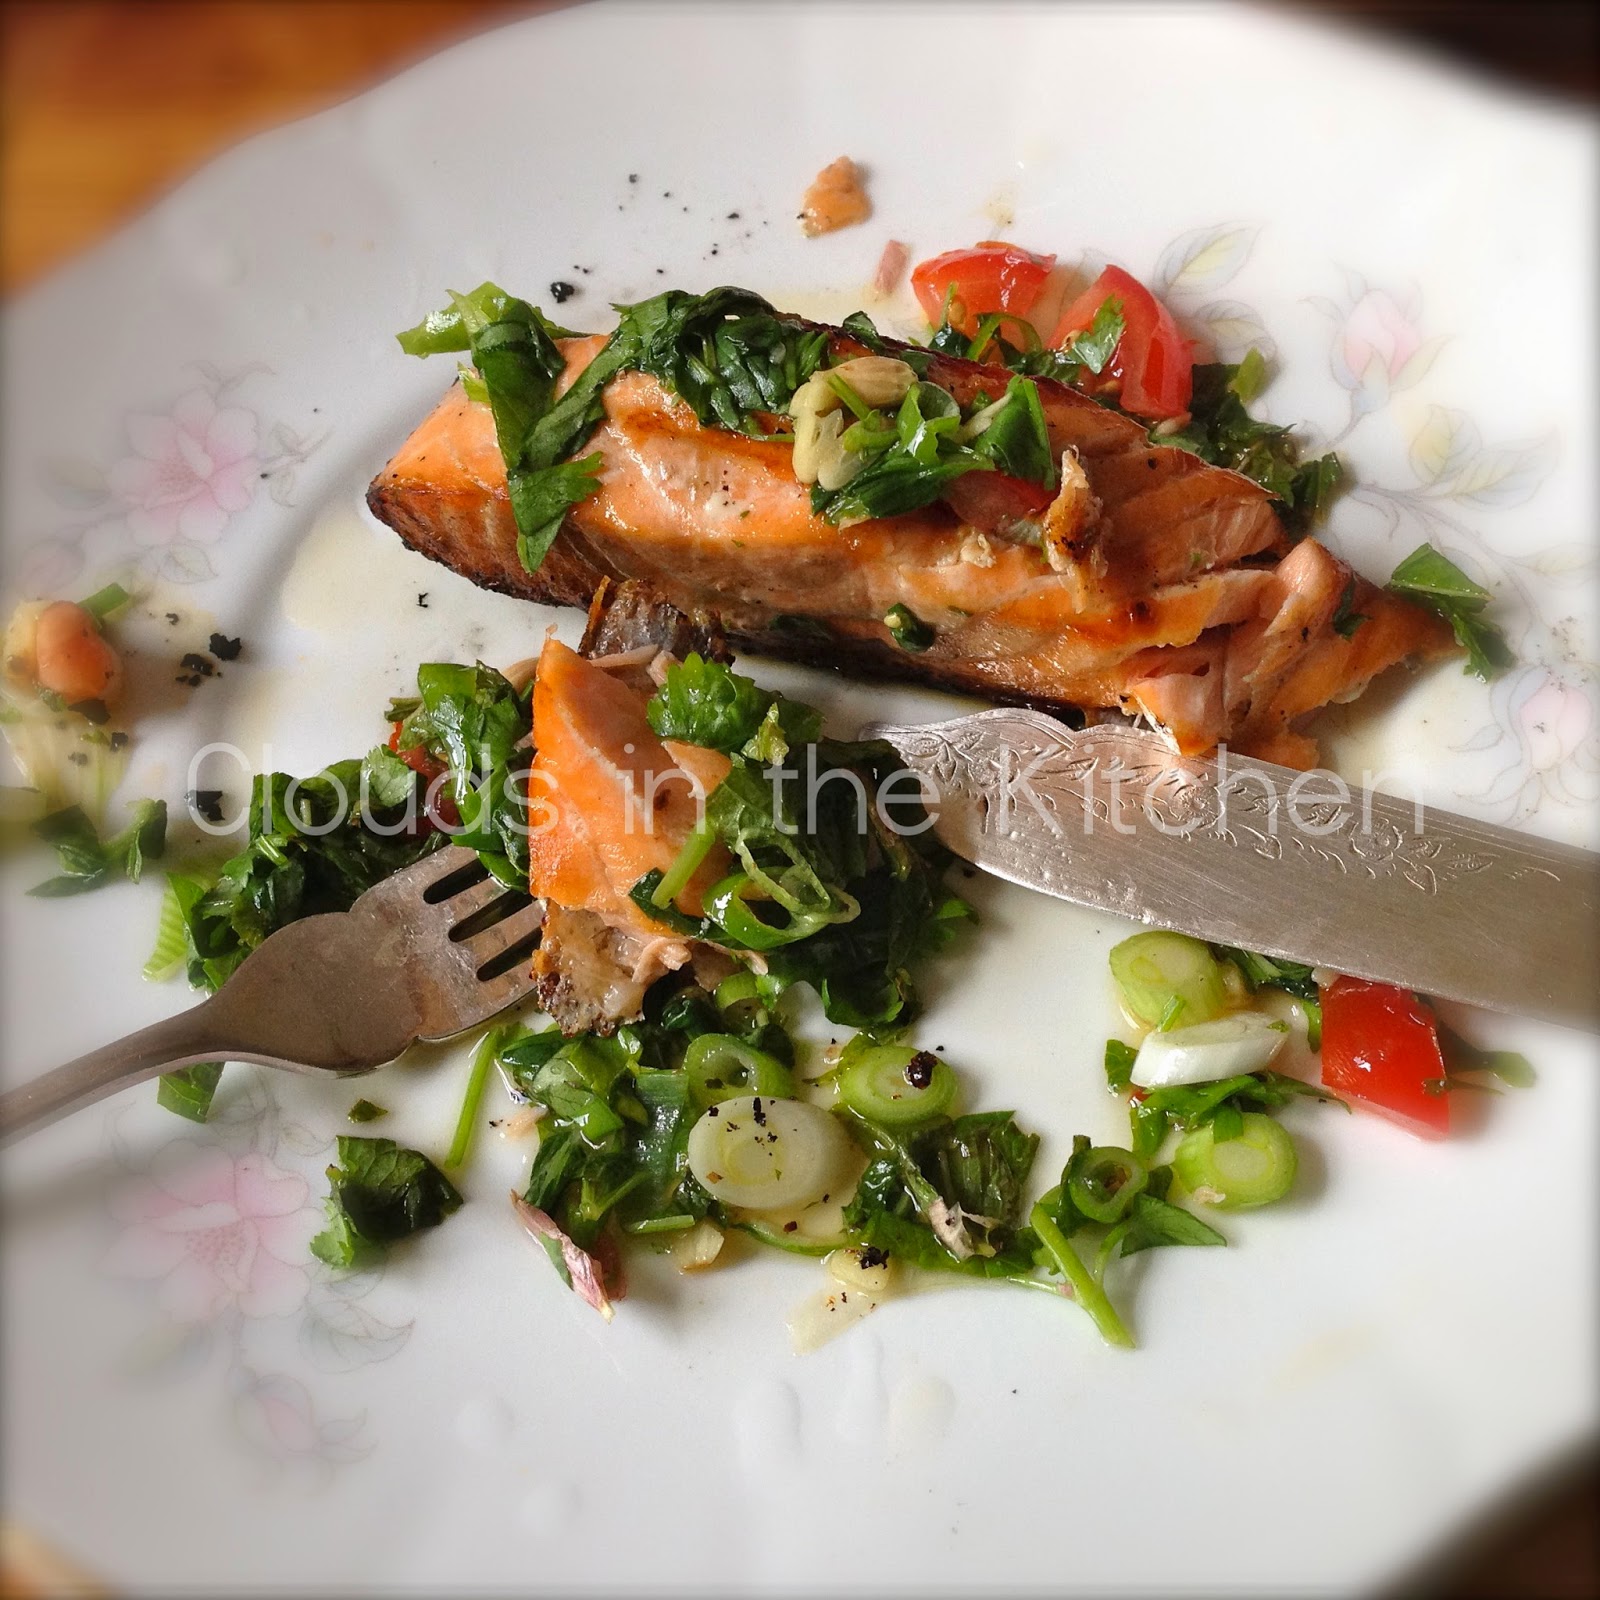
Thai Inspired Salmon


In my 18 months in Thailand I never saw them eat salmon. 
So all the Thai salmon recipes you see are fusion dishes, do not get fooled.

Real Thai food contains a tremendous amounts of herbs. Herbs are ingredients. They are a fundamental part of what defines Thai cooking, not used only as garnish.

I was watching the video of my favourite cook in Chiang Mai and she was teaching me how to make a fish dish with herbs. No, she did not use salmon, 
but that is what I had at home, so hence this inspired recipe.
The recipe I give you now is for the fish you see in the photo, adapted and very yummy!!!  
Her original recipe I am saving for my book... 
You can wait a little, right?


You will need:

1 piece fish with skin on {any fish you like} 
juice of 1/2 big lime
2 tablespoons of nam pla {fish sauce}
1 small diced tomato
1 chopped spring onion
1 tablespoon of chopped mint
1 tablespoon of chopped thai basil {if you don't have it use any basil}
1 tablespoon chopped coriander stalks or thai coriander {pak chi farang, if you can find it}
1 teaspoon coriander leaves
1 small green or red chilli bashed with a knife and chopped 
1/4 teaspoon of sugar {demerara or palm sugar are best}

Grill, fry or BBQ your fish and make sure to crisp up the skin. This is important as it makes your dish have a myriad of textures.
Meanwhile, prepare and mix all the other ingredients in a bowl. Adjust the seasoning. It should be spicy, salty, tangy and have a round flavour to it.
Place the fish on a pretty plate and pour the seasoned herbs on top.
Serve it immediately.

Believe me, you will not regret making this!

You can also use this recipe for grilled seafood, meat, chicken or pork.

Let me know what did you think of this recipe and please share it with your friends! 

Thanks!!!

Sawadee Ka
_/\_


7.7.14

Clouds Low Carb Bread


This is a savoury take on a tart recipe I created for a low carb diet.
It worked and I am as happy as I can be.
It is easy and quick.
But it also sooooo good.
I have bread and that was what I was missing. I love BREAD!!!

I have already had it as sandwich {tuna and onion being my favourite}, bruschetta, with chocolate spread, toasted with a fried egg on top and in a club sandwich.

I have made it this time in a square baking tray so it reminds me of focaccia, so if you want you can even use rosemary on it or sun dried tomatoes or whatever flavour you prefer.
Next time, I shall make it plain with lots of other seeds for the crunch.

You will need:

8 tablespoons oat bran + 1 tablespoon for "flouring" the tin
4 eggs
1 teaspoon of baking powder
1 pinch of salt
1 teaspoon of caraway seeds slightly crushed by a pestle and mortar or any other seeds/spices/herbs/vegetables you may want to add {optional}
1/2 cup of fat free or full fat fromage frais or yoghurt
2 tablespoons of powdered milk
2 tablespoons of cornflour {cornstarch}
2 tablespoons of chia seeds {optional}

Pre heat the oven to 200 degrees Celsius.
Lightly oil the baking tin {I used a 20X20cm for this} and "flour" it with 1 teaspoon of oat bran.
In a bowl, mix all other ingredients. Let it sit for 5 minutes and mix again.
Pour the batter on the tray and bake it on the top shelf.

I baked mine on 200 Celsius for 5 minutes and then turned it down to 180 Celsius for another 10/15 minutes. It depends in your oven, so you will know when it is ready when you insert a toothpick and it comes out clean.

I am very curious to hear about your experience making and tasting this.

I am also interested to know in what way and with what you ate yours!!

Have fun and keep me posted!!!

30.6.14

Low Carb Apples, Blueberries and Cinnamon Tart


It is my low carb take on my apple cake. 

It will make your taste buds come alive.

It is so easy and quick to make and Oh, So Comforting to Eat!

Your home will smell lovely whilst this is in the oven, total Cinnamon sweetness...

Unlike all the other cakes and tarts I make, I prefer to eat this one cold. It makes the texture a bit more full bodied, if it makes any sense.
If it does not make sense, have a piece when it is hot and then have a cold one later, you will understand what I mean.

Let's get cooking!!!

You will need:

4 eggs
1 tablespoon baking powder
1/2 cup quark
1/2 teaspoon vanilla essence
1 heap teaspoon of ground cinnamon {or more, if you are a cinnamon lover like me}
1/3 cup xilytol {or sweeten to taste with your preferred sweetener}
8 tablespoons oat bran
2 sliced in 3mm gala apples {skin and all}
1 grated small carrot {coarse grater}
1/2 cup of blueberries


Pre-heat the oven to 200 degrees centigrades.
Beat the eggs until they are mixed well and add all ingredients to a bowl {except the blueberries} and mix well. Let it sit for 5 minutes and mix again.
Spread some oil on a non stick baking tray {20X20cm on this particular recipe} and remove the excess with kitchen paper.
Pour the mix in and top it up with the blueberries.  Take it to the oven, top shelf.
I baked mine on 200 Celsius for 5 minutes and then turned it down to 180 for 10/15 minutes. Keep checking. It will be ready when you insert a toothpick and it comes out clean. Remember all ovens are different, so keep checking.


PLEASE NOTE:
DO NOT leave it inside the oven after you have turned it off because it carries on cooking and it will dehydrate anything that stays in there. That is a massive mistake people make that makes all foods dry and paper like.

I hope you enjoy this recipe.

Please share with your friends and make comments, if you can.

25.6.14

Scallops with Chorizo


Cooking does not have to be complicated, elaborate or boring!
You can get big flavours with simple ingredients.
I had this ready in less than 5 minutes.
Just make sure everything is at room temperature.

Please take a moment to read the instructions for cooking before you start making it.

You will need:

6 scallops
6 pieces or slices of chorizo {I used sliced as it was all I had here but prefer the pieces/chunks spicy/hot}
1 tablespoon of extra virgin olive oil
A squeeze of fresh lemon {optional but it does bring some zing to the dish}

Option 1 - Chorizo pieces: Heat a griddle pan, wok or frying pan until it is almost at smoking point and add the chorizo pieces and olive oil. Mix it until the chorizo releases its oils {about 30 seconds} and add the scallops, stir and let it cook undisturbed for about 1 minute and then turn them over for another minute and turn the heat off. Serve and squeeze the lemon, if using it.

Option 2 - Chorizo slices: Heat the pan of your preference like above. Add olive oil and scallops and cook them undisturbed for one minute then turn the scallops over and add the sliced chorizo, stir and cook for another minute and turn the heat off. Serve and squeeze the lemon, if using it.

You can add black pepper if you wish and some chopped parsley or even garlic if that is what you want. When I made it this time, I went for the big and yet simple flavours.

When I do use garlic, I chop it roughly and add it before I turn the scallops over, so it does not cook the garlic too much. If using parsley, I add it just before turning the heat of and stir. I sprinkle the black pepper right at the end too as I love its raw earthy fragrance.

Serve with a salad, a slice of toasted bread or both ...


16.6.14

Foil Lid


I was simmering a Thai dish on my wok and realized I needed a lid.

As my wok is massive, I had no lid for it!

And then I saw it, sitting there on top of the counter, calling my name and my imagination:

FOIL!!!

A brilliant moment of inspiration!

And the best part was that, afterwards there was no washing up to do!!

17.5.14

Salada Brasileira e Thai


Criei essa salada rápida e saudável que junta as cores do Brasil e os sabores asiáticos.

Fácil, flexível e deliciosa!
Você pode trocar os ingredientes e usar aqueles que tem em mãos!
Lembre-se que as castanhas do Brasil são riquíssimas em selênio que ajuda administrar e prevenir o cancêr e em poucas quantidades auxilia a diminuir o colesterol.
A abóbora japonesa é um ingrediente com baixa calorias e contém alto teor de ferro, potássio, fósforo e magnésio {que auxilia na absorção de cácio} e proporciona um alto nível de saciedade.

Essa salada é muito saborosa e muito saudável e os sabores confortantes!

Você precisará de :

1 punhado de rúcula {ou qualqur outra folha como agrião, alface ou escarola}
1 abobrinha {eu usei a amarela, mas a verde é deliciosa tabém}
Castanhas do Brasil cruas
2 fatias de abóbora japonesa cozida

Um fio de molho de peixe Thai {nam pla- disponível em qualquer mercado asiático ou mesmo em grandes supermercados}
Se for vegetariano usar molho de soja com umas gotas de limão
Vinagre de arroz {encontrado em qualquer supermercado}
Óleo de gergelim tostado {encontrado em qualquer supermercado mas em mercados asiáticos o preço é substancialmente mais barato}

Arrume os ingredientes em um prato e por cima escorra um fio de molho de peixe tailandês ou molho de soja, arroz de vinagre e óleo de gergelim tostado.

Essa receita é deliciosa e seus sabores são surpreendentes quando juntos.


8.5.14

Flowery Ice, Pretty Water...


A lover of pretty things, I insist in making use of edible flowers in my food...

I believe that you do eat with your eyes first and, as I am in constant need to feed myself
 with lovely things, I ordered pretty edible flowers.
After I used them for salads, antipastos, pastes and garnishes I still had some leftovers and decided to take this a step further.

I made flowery ice which is a simple, easy and fun thing to do.

Get all the edible flowers you can find or choose only your favourite.
It depends on the occasion I choose one type or a few different ones. 

Add the flowers to a half filled tray after the squares
 {or whatever tray shape you choose}
 are almost frozen. 


After you add the flowers fill the tray with more water pushing the blossoms 
deeper with enough care not to bruise them.
Put the tray back in the freezer and wait until completely frozen.

This is what the ice cubes looked like.

Now add them to a glass of water or some coconut water {I have even made the flowery ice with white wine to use it in wine for a special occasion}.


You can eat the flowers after the ice has dissolved as they are edible and hopefully organic!

Have fun and enjoy a beautiful glass of any clear drink that will make you 
and your guests feel incredibly special.


27.4.14

Roast Garlic


I normally make this at home every week as garlic is my favourite ingredient.
For sure I make this every time I have my oven on for savoury food.

It is very easy and quick.
Basically I separate huge cloves of garlic {do not peel them} and put them on a tray with olive oil, rock salt and only a little bit of oregano or/and thyme, a crushed bay leaf and a twist or two of freshly ground pepper.

The oven is pre-heated somewhere between 180 to 200 degrees Celsius.
I let it roast until the desired colour and texture for about 20/30 minutes {try squeezing it with your fingers or a spoon to see how soft it is}. 


Sometimes I allow it to cook a little more so it becomes soft and the garlic inside is like a paste.
It squirts as you press the garlic... it is such fun !
Try it !!!


This can be eaten on toasted bread, added to salads, soups, roast meat or as you like it.

I am known to eat it on its own as I am preparing dinner or reading a book!!!


7.3.14

Thai Fried Banana, Gluai Tot


Those are amazing!
So simple to make and a delicious snack or desert!
When I asked for the exact measures for the lady who sells them around the corner from me,
 she told me to get a bowl and add to it:

1 cup of plain flour {approximately}
1/3 cup of fresh grated coconut {or desiccated coconut}
sugar to taste
about 1 litre of water {add a little more if you need to}
a pinch of salt
1/4 cup of white sesame seeds
Bananas cut lengthwise or any pretty way you wish as long as it is cut about 1.5 cm thick {she uses them slightly green, like a day before they are ripe enough to eat on their own, but I have tried this with ripe bananas, they are fabulous either way}

vegetable oil to fry

Mix all ingredients, except for the oil and bananas and beat it by hand {she uses a wooden spoon} until is all like a paste.  Make it thick but runny. It should not make it a very thick coat. On this video you can see the consistency of it and how to fry them.

Add the bananas {and they also use here sun dried bananas or sweet potatoes and I even had this made with durian} to the batter and mix.

Heat the oil, careful not to smoke it and when hot enough so that you drop a little drop of batter and it starts to fry immediately, you take one banana at the time and add them to the oil. Fry the bananas until they are golden brown. Place them on kitchen paper and preferably eat them hot!!!

This batter is to be made and used on the same day!

Hope you have fun and let me know how much you like it!

14.1.14

1 Pii Tii Nii 1 ปีที่นี่ 1 Year Here


I have been in Chiang Mai for 1 year.
1 year and 1 month exactly.
In total, 1 year and 2 months, as I stopped at the islands first.

I have been here before, to Thailand I mean...
But this time it just took me.
I surrendered to the Thai ways and the charisma of the people from Chiang Mai.
The markets, flavours, colours, people and the peace that permeates Northern life has made me stay.

I have on and off thought of leaving and made moves to go back to the West only to come back here and get more and more ingrained in Thai living.

I have learned some Thai language which is enough to ensure I go by in the markets and get round the city, always receiving a smile for my attempts to try and speak and I even receive compliments for my accent, which apparently my accent is good, when they can understand me at all.

I have made video after video here, trying to show you what I eat, where I visit and how sweet and giving the Thais can be!

I am learning about myself constantly and going through major personal changes and Chiang Mai seems to be the perfect place for me to do it. To BE!

Click here to see the list of all the videos I made in the last year.

I hope you enjoy !

Happy New Year Everyone!!!!
Sabbai Dii Pii Mai Jiao!!!